Showing posts with label bread. Show all posts

Wednesday, October 1, 2014

The Non-New Yorker's Guide to Homemade Bagels!!

Bagels in under 2 hours!! 


I was a little intimidated to make homemade bagels at first! However, I decided I would give them a whirl. My husband eats an everything bagel every morning before heading off to work, so I figured if I could make something healthier, lighter and tastes better with ingredients I can pronounce why not! Here goes: 

First you start with your average dough base: yeast, sugar, water, salt, and flour. The trick here is to use bread flour which is higher in gluten than your average all-purpose flour. Your going to combine all the dry ingredients in a Kitchen-Aid with dough hook attachment, and slowly add the water until combined. About 3-4 mins while on low speed. Once combined switch the speed to med-high (#3) and knead for about 8-9 mins until the dough pulls aways from the sides and is tacky and smooth. Yes let the machine run for the full time. You want to activate the gluten in the flour.  Finally, take the dough out it should look like the above picture. Allow the dough to rest for 1 hour to rise. Place it in a lightly oiled  bowl and cover with a clean kitchen hand towel. It will double in size. 
Once the dough has doubled plop it out on a clean work surface that is lightly floured. De-gas the dough. Meaning lightly press on the dough to alleviate any gas bubbles. Let the dough rest for 10 min. Now you will want to divide the dough into 8 equal portions. I lay the dough out in a circle and cut it like a pizza (I'm from the midwest). Roll each of the 8 pieces into a smooth ball. Then with a floured finger poke a hole in the center and stretch it out so that it is about 1/3 of the entire bagel. Trust me they with shrink when it cooks I have made the mistake of making them too small but they taste the same. Place the bagels on a baking sheet with parchment paper as shown above. Allow to rest another 10 min covered with the same towel. 
Next step is to boil these babies. Bring a pot of water to a boil and then allow it to simmer while the bagels are resting. Boil 2-3 at a time 1 min on each side. Then top with your favorite toppings or leave plain. We chose everything topping YUMMY! Recipe is at the bottom. 

Place in a 425 degree oven for 20-25 minutes until golden brown. 
ENJOY!

Ingredients:
3 1/2 c. Bread Flour
1 Pkg yeast (2 1/4 Tsp if using a jar)
2 tsp Granulated Sugar
1 1/3 c. Warm water 
1 3/4 tsp Kosher Salt 
Toppings of choice

      Combine the yeast, flour, sugar, and salt in a stand mixer. Turn mixer on low while slowly adding the water. Continue to mix until dough comes together about 4-6 mins. Then increase speed to med-high and knead for 8-10 minutes until soft and smooth. Place dough in a lightly greased bowl and cover with a clean towel. Allow to rise and double in size about 1 hour. 
     De-gas the dough and allow to rest for 10 minutes.Preheat oven to 425 degrees and bring a large pot of unsalted water to boil. Then turn to simmer.Divide dough into 8 pieces and de-gas the each piece and roll into a ball. Use a floured finger and create a hole in the center of the dough roughly 1/3 of the size of the bagel. Place the bagel on a baking sheet lined with parchment paper and allow to rest for another 10 minutes. 
    Gently lower 2-3 bagels into the boiling water and cook for 1 minute on each side. Once done place back on to the parchment paper and top immediately with your favorite toppings. Place baking sheet into the oven and cook 20-25 minutes until golden brown. Allow bagels to cool completely. 

Everything Topping:
1 Tb Sesame Seeds
1 Tb Minced Garlic (dried)
1 Tb Minced Onion (dried)
2 tsp Poppy Seeds 
1 tsp Kosher Salt 

Top Bagels liberally, and place remaining in an air tight container. 


Friday, November 15, 2013

Crusty Artesian Bread


 photo 8f0c5c2f-66ce-4ac6-90e8-3aa8e443323b_zps5ff0db0d.jpg


Baking this bread feels like I can compete with Panera. Haha. Joe is a huge bread person when it comes to meals as well as for lunch bread for sandwiches. This recipe is extremely easy yet it is sort of time consuming, because it does take about 12-18 hours for the bread to rise. However there is not a lot of active time. This is a no-knead bread so when I say easy it is literally impossible to mess up unless...you do not let it rise enough. I would consider making it at night and then baking it first thing in the morning. I have also included step by step pictures of how the process looked as I went along. I feel this would make it easier for other visual learners like myself. Enjoy! No more store bread! 

Ingredients: 
  • 3c. All Purpose Flour
  • 1 tsp Active dry Yeast
  • 1/2-1 tsp salt
  • 1 1/4c Warm Water 
Directions: 
  1. Combine flour, yeast, and salt in a large bowl. 
  2. Pour water into dry mixture and mix with a wooden spoon until combined. Dough should resemble a very sticky dough. Add more water if needed 1TB at a time.
  3. Cover dough with plastic wrap and allow to remain at room temperature for about 12-18 hours (usually overnight).
  4. Preheat oven to 450 degrees. Once preheated place a dutch oven (empty) with lid into oven to preheat for 30 minutes. 
  5. While dutch oven is preheating place dough on a very floured surface and form into a ball. Minimal contact is good here. Remember to flour hands because the dough is very sticky.Once in a ball place plastic wrap (the same that covered the bowl) over the dough and let rest 30 min while pot is in the oven
  6. Once the dutch oven is preheated place the dough into the dutch and cover with lid. The oven will be very very hot so be careful doing this. No need to oil pan the bread will not stick trust me. 
  7. Bake at 450 for 30 min. 
  8. Take lid off after 30 min is up and bake for an addition 15 minutes to get a nice crusty golden crust. 
  9. Once finished cool completely and slice for everyday use.  

Step by Step Pictures


 photo 7a8688cf-ede5-4003-81e1-f5c61cc7049b_zpse284705f.jpg
This is how the dough should look while rising. In step 3.


 photo c49eeac6-8d99-432d-b70d-4e13b546c93f_zps5eabcf4a.jpg
After placing the dough the pot and baking for the 30 min. with the lid on. Steps 6-8


 photo 4225147b-da60-416d-8dc9-0ccd71536b0c_zps722ab99d.jpg
The final inside product! Delicious!! 

Thursday, November 14, 2013


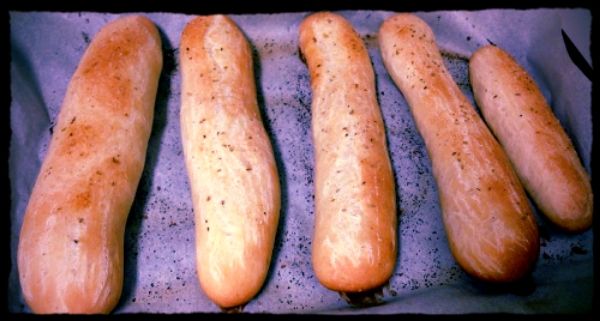
These bread sticks are amazing!! They are perfect for your italian night or a great side dish to my cheesy stuffed shells! However they do make about 16 bread sticks which is WAY to much for two people. So instead of cutting the recipe in half I decided to freeze about 12 of them for a later use. Which will probably be for my Chicken Broccoli Alfredo I will be making next week. Yahoo no baking next week. 

Ingredients: 
    
               For the dough:

  • 4-1/4 Cups All-Purpose Flour
  • 1 pkg dry active yeast (or 2-1/2 tsp if you have a Jar like me) 
  • 2 Tbs unsalted butter (softened)
  • 2 Tbs Sugar
  • 1 Tb salt (fine sea salt) 
  • 1- 1/2 c.  warm water (divided) 
              For Topping: 
  • 3 Tbs unsalted butter (melted)
  • 1/4 tsp salt
  • 1/4 tsp Garlic powder 
  • pinch of oregano 
Directions: 
  1. Add 1/4 c.  water to a mixing bowl and sprinkle yeast on top. Allow to rest 5 minutes until bubbly. 
  2. Combine flour, sugar, and salt. Combine dry mixture to yeast mixture. Pour the rest of the 1- 1/4 c. water in and mix until a sticky ball forms with a paddle (kitchen aid or by hand) about 5 minutes. 
  3. Place ball onto floured surface and knead by hand for 3 minutes. 
  4. Roll dough into a 2 foot long log. Slice the log evenly into 16 pieces. 
  5. roll each piece into a 7 in long stick and place on a backing sheet. 
  6. Allow each stick to double in size covered with a bowl for about 45 minutes. 
  7. Preheat oven to 400 degrees
  8. Create topping by melting butter. Combine the salt, garlic, and oregano in a separate dish. Baste butter along all of the sticks and sprinkle with seasoning. 
  9. Bake the breadsticks for approx. 15 minutes or until light golden brown. For a softer bread stick bake 10-12 minutes.
I hope you enjoy these as much as we did. Word to the wise I used parchment paper over the baking sheets and it turned the bottom of mine a little crunchier than I would normally like but still very good. So I would periodically check yours if your oven is hot.