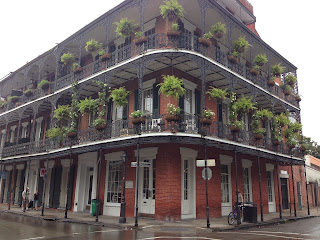
Sunday, November 17, 2013

French Quarter New Orleans

New Orleans Trip October 2013 


We had a lot of fun in New Orleans! The music was amazing and the food was delicious. However I was a little upset that I did not get to try a crawfish boil because they were not in season :( but we did get to eat a giant plate of seafood and boiled potatoes. We walked everywhere and I was exhausted! We ended up with some neat souvenirs to take with us back to San Diego. We purchased a really good cajun cook book so I can try to duplicate the creole recipes that we enjoyed so much. We also got some printed pictures to frame for our kitchen walls that included of course Fleur-de-lis.  I would definitely return not pregnant so that I can enjoy bourbon street a little more :) 

Friday, November 15, 2013

Clone of Founders Breakfast Stout!

Breakfast Stout Clone 


 photo 78d474ed-6708-4edd-a0b0-ba614c304464_zps223110fe.jpg

   This recipe is going to be fantastic once it is done! There was a lot of coffee involved in this recipe hence breakfast stout. We followed the clone recipe pretty perfectly so I am interested to see how this will be in comparison to the original which is pretty delicious made by founders. It is one of our favorite stouts to date which is why we decided to do a copy cat. 
   This batch is currently still in production and should be ready for bottling in about a week and a half. Then it will require a 2 week bottling relaxation before we can sample it. Too bad I will not be enjoying it for quite some time :( Its a good thing that stouts age well! I will be updating this post frequently as the process continues and will be adding the recipe at a later time if anyone is interested in duplicating the wort. I will admit that this bad boy has a shit ton of ingredients in it, but hopefully worth it. 


Prep Time 
Beginning of the Wort

 photo 559c2bc7-77a4-4ea0-b2ac-2141f3b29d4b_zpsebd3a964.jpg

Accent Walls


Joe and I recently needed to update of freakishly white interior of our house. So we actually agreed on doing a purple accent wall. I am completely obsessed and I believe that we had made a great choice. I blends really well with our new furniture that we had purchased for the living room. 


 photo 93c07ed1-1bdd-4b05-b595-2cc49457493e_zps9752eeb2.jpg

We used Bher Frosted Mulberry with primer included that we had purchased from Home Depot. It was one of the best $25 We have ever spent. It completely opens up the room. We have an open floor plan and it is so nice to see from the kitchen. 

Crusty Artesian Bread


 photo 8f0c5c2f-66ce-4ac6-90e8-3aa8e443323b_zps5ff0db0d.jpg


Baking this bread feels like I can compete with Panera. Haha. Joe is a huge bread person when it comes to meals as well as for lunch bread for sandwiches. This recipe is extremely easy yet it is sort of time consuming, because it does take about 12-18 hours for the bread to rise. However there is not a lot of active time. This is a no-knead bread so when I say easy it is literally impossible to mess up unless...you do not let it rise enough. I would consider making it at night and then baking it first thing in the morning. I have also included step by step pictures of how the process looked as I went along. I feel this would make it easier for other visual learners like myself. Enjoy! No more store bread! 

Ingredients: 
  • 3c. All Purpose Flour
  • 1 tsp Active dry Yeast
  • 1/2-1 tsp salt
  • 1 1/4c Warm Water 
Directions: 
  1. Combine flour, yeast, and salt in a large bowl. 
  2. Pour water into dry mixture and mix with a wooden spoon until combined. Dough should resemble a very sticky dough. Add more water if needed 1TB at a time.
  3. Cover dough with plastic wrap and allow to remain at room temperature for about 12-18 hours (usually overnight).
  4. Preheat oven to 450 degrees. Once preheated place a dutch oven (empty) with lid into oven to preheat for 30 minutes. 
  5. While dutch oven is preheating place dough on a very floured surface and form into a ball. Minimal contact is good here. Remember to flour hands because the dough is very sticky.Once in a ball place plastic wrap (the same that covered the bowl) over the dough and let rest 30 min while pot is in the oven
  6. Once the dutch oven is preheated place the dough into the dutch and cover with lid. The oven will be very very hot so be careful doing this. No need to oil pan the bread will not stick trust me. 
  7. Bake at 450 for 30 min. 
  8. Take lid off after 30 min is up and bake for an addition 15 minutes to get a nice crusty golden crust. 
  9. Once finished cool completely and slice for everyday use.  

Step by Step Pictures


 photo 7a8688cf-ede5-4003-81e1-f5c61cc7049b_zpse284705f.jpg
This is how the dough should look while rising. In step 3.


 photo c49eeac6-8d99-432d-b70d-4e13b546c93f_zps5eabcf4a.jpg
After placing the dough the pot and baking for the 30 min. with the lid on. Steps 6-8


 photo 4225147b-da60-416d-8dc9-0ccd71536b0c_zps722ab99d.jpg
The final inside product! Delicious!! 
 photo b61438e4-201d-4a95-b08c-a31ea7af398d_zpsd220c4b9.jpg

Joe and I have been married for about 4.5 years now and are currently residing near Camp Pendleton, Ca where we are stationed. We love finding new furniture to fix up and make new again while adding to our new house. We are also expecting a baby girl (Fallon) this coming March 2014. We are very excited, and I will be uploading some of the DIY baby projects we will be doing shortly for her nursery


 photo 1b7179fe-ed4f-4ec8-89c6-13dbcabebf74_zps1e7721b5.jpg
There is one more baby girl in our life and her name is Cali. She is our (almost) four year old Black Lab that we don't know what we would do with out her. She has been everywhere with us from our trip cross country to Cincinnati to our return cross country trip back to San Diego. I swear that dog has been to more states than most people! We love her dearly and she is definitely part of the family!! 

Thursday, November 14, 2013


These bread sticks are amazing!! They are perfect for your italian night or a great side dish to my cheesy stuffed shells! However they do make about 16 bread sticks which is WAY to much for two people. So instead of cutting the recipe in half I decided to freeze about 12 of them for a later use. Which will probably be for my Chicken Broccoli Alfredo I will be making next week. Yahoo no baking next week. 

Ingredients: 
    
               For the dough:

  • 4-1/4 Cups All-Purpose Flour
  • 1 pkg dry active yeast (or 2-1/2 tsp if you have a Jar like me) 
  • 2 Tbs unsalted butter (softened)
  • 2 Tbs Sugar
  • 1 Tb salt (fine sea salt) 
  • 1- 1/2 c.  warm water (divided) 
              For Topping: 
  • 3 Tbs unsalted butter (melted)
  • 1/4 tsp salt
  • 1/4 tsp Garlic powder 
  • pinch of oregano 
Directions: 
  1. Add 1/4 c.  water to a mixing bowl and sprinkle yeast on top. Allow to rest 5 minutes until bubbly. 
  2. Combine flour, sugar, and salt. Combine dry mixture to yeast mixture. Pour the rest of the 1- 1/4 c. water in and mix until a sticky ball forms with a paddle (kitchen aid or by hand) about 5 minutes. 
  3. Place ball onto floured surface and knead by hand for 3 minutes. 
  4. Roll dough into a 2 foot long log. Slice the log evenly into 16 pieces. 
  5. roll each piece into a 7 in long stick and place on a backing sheet. 
  6. Allow each stick to double in size covered with a bowl for about 45 minutes. 
  7. Preheat oven to 400 degrees
  8. Create topping by melting butter. Combine the salt, garlic, and oregano in a separate dish. Baste butter along all of the sticks and sprinkle with seasoning. 
  9. Bake the breadsticks for approx. 15 minutes or until light golden brown. For a softer bread stick bake 10-12 minutes.
I hope you enjoy these as much as we did. Word to the wise I used parchment paper over the baking sheets and it turned the bottom of mine a little crunchier than I would normally like but still very good. So I would periodically check yours if your oven is hot.